Zabbix
Updated 23 April 2021

Introduction
Zabbix is a free system for monitoring and tracking the status of many network services, servers and network equipment. A Zabbix server is the core of the system, which remotely controls network services and is the repository containing all configuration, stats and runtime data. It is the part of Zabbix that alerts the administrator of any monitored hardware problem.
This article explains how to install and configure the server part of Zabbix on a Calculate Scratch Server with a Web interface and agent.
Creating LXC container
We recommend that you install Zabbix in a separate container, that you would have created and configured according to the manual.
Installing and configuring PostgreSQL
Install and configure PostgreSQL, as explained in the manual. Replace dbtest with zabbix, and test with zabbix.
Installing and configuring Nginx
Install and configure your Nginx server, then setup PHP-FPM as described in the manual.
Installing and configuring a Zabbix server
Before installing, add the required USE flags for the Zabbix package for Web interface and server support:
/etc/portage/package.use/custom
net-analyzer/zabbix frontend server
Install Zabbix:
emerge -a net-analyzer/zabbix
Add open port settings for Zabbix to run:
/etc/services
zabbix-agent 10050/tcp Zabbix Agent
zabbix-agent 10050/udp Zabbix Agent
zabbix-trapper 10051/tcp Zabbix Trapper
zabbix-trapper 10051/udp Zabbix Trapper
Required PHP settings for Zabbix
/etc/php/fpm-php7.4/php.ini
# Max allowed data size
post_max_size = 16M

# Max time in seconds for the script to fully load
max_execution_time = 300


# Max time in seconds for the script to handle all input data
max_input_time = 300
Once the settings have been saved, restart PHP and Nginx:
/etc/init.d/php-fpm restart
/etc/init.d/nginx restart
Importing database layout for Zabbix
Reset your database layout:
cd /usr/share/zabbix/database/postgresql/
cat schema.sql | psql -U zabbix
cat images.sql | psql -U zabbix
cat data.sql | psql -U zabbix
Setting up a web interface
To be able to use the Web interface, first copy the Zabbix files to the corresponding directory on the server:
cp -r /usr/share/webapps/zabbix/5.2.4/htdocs/* /var/calculate/www/example.org/zabbix/"
Start both the Zabbix server and agent:
/etc/init.d/zabbix-server start
/etc/init.d/zabbix-agentd start
Add the Zabbix server and agent to autostart:
rc-update add zabbix-server
rc-update add zabbix-agentd
Go to http://example.org/zabbix in your browser and complete the configuration process:

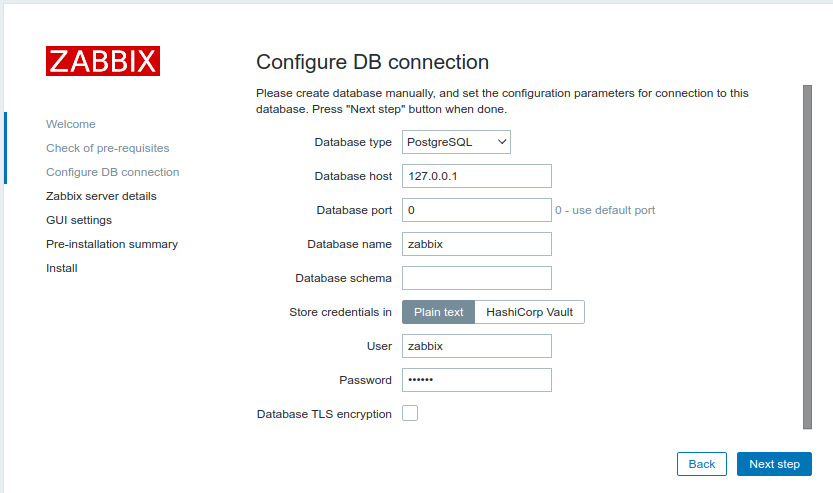
Specify the connection details for the database:

The connection port must not change:

Use Admin as user and zabbix as password for authentication:
